Go 部落格
From zero to Go:24 小時內在 Google 首頁發佈
引言
這篇文章是由來自 Google 搜尋團隊的軟體工程師 Reinaldo Aguiar 所撰寫的。他分享了他開發第一個 Go 程式,並將其發佈給數百萬受眾的經驗,而且這一切都只花了一天!
我最近有機會參與一個雖小但卻影響力十足的「20% 專案」:2011 年感恩節 Google 塗鴉。塗鴉的主題是一隻火雞,牠是透過隨機組合不同種類的頭部、翅膀、羽毛和腿部而成的。使用者可以透過點擊火雞的不同部位來客製化塗鴉。這種互動性是透過 JavaScript、CSS,當然還有 HTML 在瀏覽器中實作的,可以在線上製作火雞。

使用者在建立一隻個人化的火雞後,即可透過發佈在 Google+ 與親朋好友分享。按下「分享」按鈕(不在此圖片中)會在使用者的 Google+ 動態中建立一則貼文,其中包含火雞的快照。快照是一張單一圖片,與使用者建立的火雞相符。
火雞的 8 個部位(頭部、兩隻腳、明顯的羽毛等)各有 13 種變形,因此有數十億張可能的快照圖片可產生。事先全部計算顯然不可行。相反地,我們必須隨時產生快照。結合這個問題以及對於立即可擴充性和高可用性的需求,平台的選擇很明顯:Google App Engine!
接著我們需要決定要使用哪一種 App Engine 執行時期。影像處理任務會受限於 CPU,因此在這情況下,效能是決定性因素。
我們執行了一項測試,以做出明智的決定。我們快速準備了幾個等效的展示應用程式,用於新的 Python 2.7 執行時期(提供基於 C 的影像處理程式庫 PIL)與 Go 執行時期。每個應用程式都會產生由數張小圖片組成的圖片,將圖片編碼為 JPEG,並將 JPEG 資料作為 HTTP 回應傳送。Python 2.7 應用程式服務請求的中位數延遲為 65 毫秒,而 Go 應用程式的中位數延遲僅 32 毫秒。
因此,這個問題似乎是測試實驗性質的 Go 執行時期的絕佳良機。
我之前沒有任何 Go 經驗,而且時間緊迫:兩天內要準備好上線。這雖然讓人望之生畏,但我視此為一個機會,可以從不同且常被忽視的角度測試 Go:開發速度。一個沒有 Go 經驗的人可以有多快上手,並建立出具備效能且可擴充性的東西?
設計
做法是將火雞狀態編碼在網址中,並隨時繪製和編碼快照。
每個塗鴉的基礎是背景
一個有效的請求網址可能類似這樣:http://google-turkey.appspot.com/thumb/20332620][http://google-turkey.appspot.com/thumb/20332620
「/thumb/」後面的字母數字字串表示(以十六進位)要為每個版面元素繪製的選項,如下圖所示

程式要求處理程式會剖析網址,以判斷每個元件選擇的元素、在背景圖片上繪製合適的圖片,並將結果作為 JPEG 提供。
如果發生錯誤,會提供預設圖片。提供錯誤網頁沒有意義,因為使用者永遠不會看到它:瀏覽器幾乎可以肯定會將此網址載入圖片標籤中。
實作
套件範圍中宣告一些資料結構,說明火雞的元素、對應圖片的位置,以及應將它們繪製在哪裡,在背景圖片上。
var (
    // dirs maps each layout element to its location on disk.
    dirs = map[string]string{
        "h": "img/heads",
        "b": "img/eyes_beak",
        "i": "img/index_feathers",
        "m": "img/middle_feathers",
        "r": "img/ring_feathers",
        "p": "img/pinky_feathers",
        "f": "img/feet",
        "w": "img/wing",
    }

    // urlMap maps each URL character position to
    // its corresponding layout element.
    urlMap = [...]string{"b", "h", "i", "m", "r", "p", "f", "w"}

    // layoutMap maps each layout element to its position
    // on the background image.
    layoutMap = map[string]image.Rectangle{
        "h": {image.Pt(109, 50), image.Pt(166, 152)},
        "i": {image.Pt(136, 21), image.Pt(180, 131)},
        "m": {image.Pt(159, 7), image.Pt(201, 126)},
        "r": {image.Pt(188, 20), image.Pt(230, 125)},
        "p": {image.Pt(216, 48), image.Pt(258, 134)},
        "f": {image.Pt(155, 176), image.Pt(243, 213)},
        "w": {image.Pt(169, 118), image.Pt(250, 197)},
        "b": {image.Pt(105, 104), image.Pt(145, 148)},
    }
)
上方座標的幾何圖形是透過測量每一影像中的配置元素大小及其實際位置計算而成。
每次要求來自磁碟載入圖像相當浪費,因此會在收到第一次要求時載入全部 106 張圖像(13 * 8 個元素 + 1 個背景 + 1 個預設)至變數中。
var (
    // elements maps each layout element to its images.
    elements = make(map[string][]*image.RGBA)

    // backgroundImage contains the background image data.
    backgroundImage *image.RGBA

    // defaultImage is the image that is served if an error occurs.
    defaultImage *image.RGBA

    // loadOnce is used to call the load function only on the first request.
    loadOnce sync.Once
)

// load reads the various PNG images from disk and stores them in their
// corresponding global variables.
func load() {
    defaultImage = loadPNG(defaultImageFile)
    backgroundImage = loadPNG(backgroundImageFile)
    for dirKey, dir := range dirs {
        paths, err := filepath.Glob(dir + "/*.png")
        if err != nil {
            panic(err)
        }
        for _, p := range paths {
            elements[dirKey] = append(elements[dirKey], loadPNG(p))
        }
    }
}
要求是以清楚的順序處理
-
剖析要求的 URL,並解碼路徑中每個字元的十進位值。
-
拷貝背景圖像做為最終圖像的基礎。
-
利用 layoutMap 將每個圖像元素繪製至背景圖像,以決定該將之繪製至何處。
-
使用 JPEG 對圖像編碼
-
透過 HTTP 回應寫入器,將圖像傳回使用者。
如果發生任何錯誤,我們會向使用者提供 defaultImage,並將錯誤記錄至 App Engine 儀表板以供後續分析。
以下是包含說明註解的要求處理程式碼
func handler(w http.ResponseWriter, r *http.Request) {
    // Defer a function to recover from any panics.
    // When recovering from a panic, log the error condition to
    // the App Engine dashboard and send the default image to the user.
    defer func() {
        if err := recover(); err != nil {
            c := appengine.NewContext(r)
            c.Errorf("%s", err)
            c.Errorf("%s", "Traceback: %s", r.RawURL)
            if defaultImage != nil {
                w.Header().Set("Content-type", "image/jpeg")
                jpeg.Encode(w, defaultImage, &imageQuality)
            }
        }
    }()

    // Load images from disk on the first request.
    loadOnce.Do(load)

    // Make a copy of the background to draw into.
    bgRect := backgroundImage.Bounds()
    m := image.NewRGBA(bgRect.Dx(), bgRect.Dy())
    draw.Draw(m, m.Bounds(), backgroundImage, image.ZP, draw.Over)

    // Process each character of the request string.
    code := strings.ToLower(r.URL.Path[len(prefix):])
    for i, p := range code {
        // Decode hex character p in place.
        if p < 'a' {
            // it's a digit
            p = p - '0'
        } else {
            // it's a letter
            p = p - 'a' + 10
        }

        t := urlMap[i]    // element type by index
        em := elements[t] // element images by type
        if p >= len(em) {
            panic(fmt.Sprintf("element index out of range %s: "+
                "%d >= %d", t, p, len(em)))
        }

        // Draw the element to m,
        // using the layoutMap to specify its position.
        draw.Draw(m, layoutMap[t], em[p], image.ZP, draw.Over)
    }

    // Encode JPEG image and write it as the response.
    w.Header().Set("Content-type", "image/jpeg")
    w.Header().Set("Cache-control", "public, max-age=259200")
    jpeg.Encode(w, m, &imageQuality)
}
為了簡潔,已省略這些程式碼清單中的數個輔助函數。請參閱 原始碼 以取得完整範例。
效能
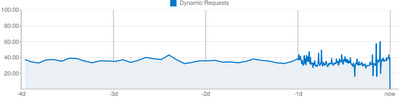
這張圖表 - 直接來自 App Engine 儀表板 - 顯示推出期間的平均要求延遲。正如您所見,即使在負載下,它也從不超過 60 毫秒,中位數延遲為 32 毫秒。這極快無比,因為我們的要求處理程式會執行圖像處理並即時編碼。
結論
我發現 Go 的語法直覺、簡潔且乾淨。過去我曾使用許多直譯式語言,儘管 Go 是靜態型別並編譯的語言,但撰寫這個程式就像處理動態的直譯式語言。
與 SDK 提供的開發伺服器在每次變更後立即重新編譯程式,因此我可以像使用直譯式語言一樣快速反覆運算。它也很簡單,設定我的開發環境不到一分鐘。
Go 優異的文件也幫助我快速地將其整合在一起。文件是由原始碼產生,因此每個函數的文件會連結到關聯的原始碼。這不僅讓開發人員可以非常快速地了解特定函數的功能,而且也鼓勵開發人員深入瞭解套件實作,讓他們能更輕易地學習風格和慣例。
在撰寫這個應用程式時,我只用了三項資源:App Engine 的 Hello World Go 範例、Go 套件文件,以及 展示 Draw 套件的部落格文章。感謝開發伺服器和語言本身實現的快速反覆運算,我能夠在不到 24 小時內開始使用該語言,並建置一個超級快速、適合製作塗鴉的生產工具。
在 Google Code 專案 下載完整應用程式原始碼(包含圖片)。
特別鳴謝設計塗鴉的 Guillermo Real 與 Ryan Germick。
下一篇文章:使用 Go 建構 StatHat
上一篇文章:Go 程式語言已滿兩歲
部落格索引